As an administrator, the administration is the central point of contact for controlling all administrative processes. You can access the administration via the Architrave menu. The administration is divided into four clear areas. The tabs at the bottom of the screen let you know which area you are currently in and use them for navigation:

Filters in the administration
In the administration there are three useful buttons for filtering elements:

Select all
Show selected
Show unselected
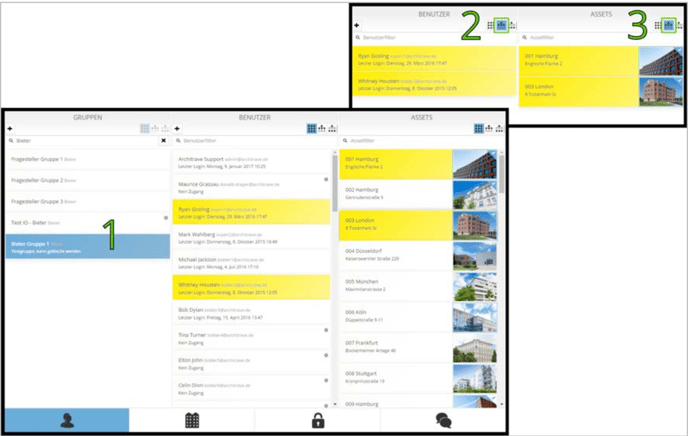
In step 1, a user group is highlighted (in blue). The associated users and assets are then highlighted in yellow. Users and assets that are not in the group will still be listed in white. In step 2 and 3 the filter 'Show selected' will be activated for both the users and the assets. Then only the two users and two assets contained in the selected group will be displayed. The filter "Show unselected" lists accordingly the non-associated elements.
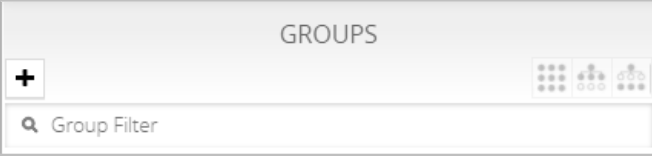
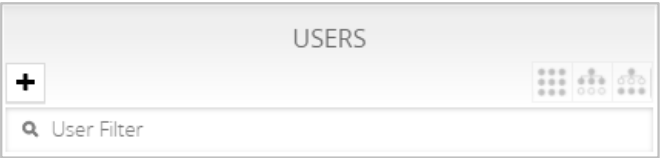
Users and groups
Here you manage all users and user groups of the data room.

Create a user group
Click on the "Plus" button in the group area on the left to open the following input mask.
Specify the name of the group and provide a description if necessary.
Select a template for permissions (e.g., asset manager, bidder, rater, etc.). Users you include in this group acquire the index-specific rights.
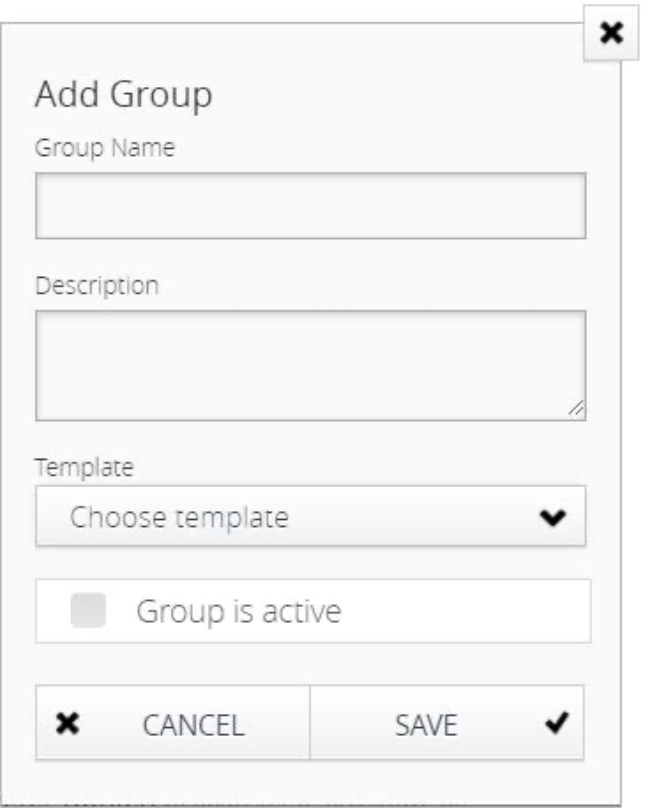
Switch the group to active or inactive. It is recommended that you do not activate this while creating a new user group. If you have added all the required users and assets to the group, you can always activate or deactivate them later.
As soon as a group is activated, all members who do not yet have access to the data room will receive an invitation by e- mail.
(Inactive groups are marked with a gray exclamation mark in the overview.)
Create a user
Click on the "Plus" button to open the following input mask for creating a new user.
Define the salutation, a title, the first and last name, the e- mail address and the language of the user interface.
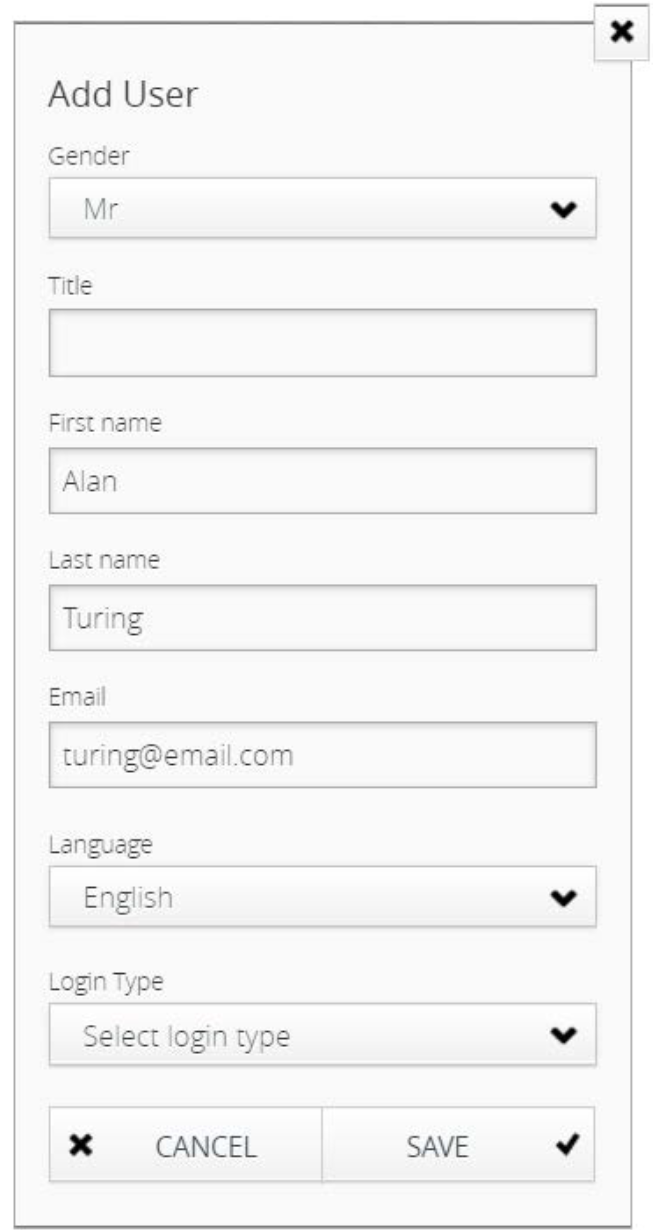
An invitation will be sent to the specified e-mail address as soon as you add the user to an active user group (see section "Add or remove users to a user group").
The e-mail address entered here must be used by the user when logging in.
Use the field 'Authentication Type' to specify whether a user logs in to the data room using his e-mail address or via SSO (Single Sign-On).
All details of the single sign-on can be found on our website, in the technical documentation SSO available for download.
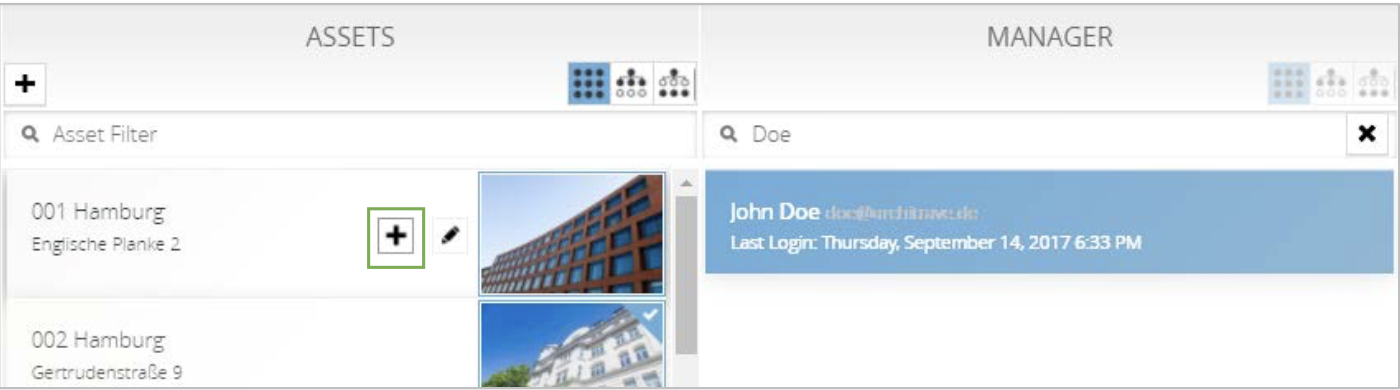
Add or remove users to a user group
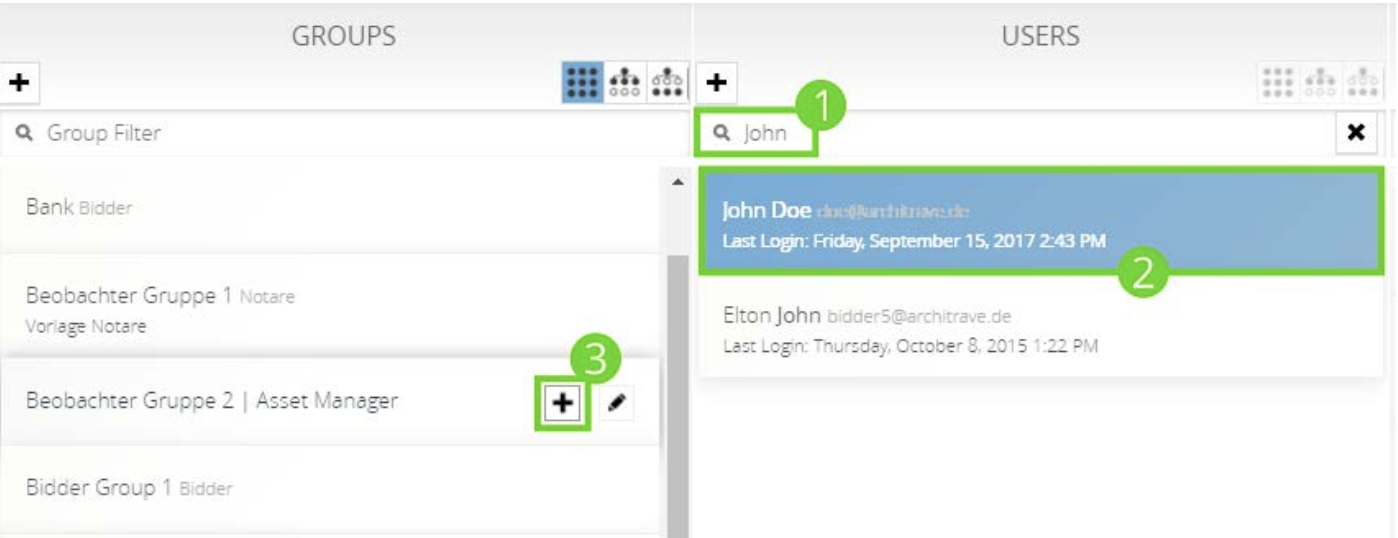
Follow these steps to add a user to a group:
1. Find the desired user via the real-time filter.
2. Highlight the user with one click. The user is now highlighted in blue.
3. Find the desired group via the search and click on the "plus" button.
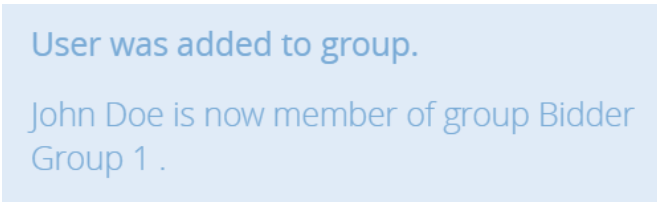
The procedure is also possible the other way around: First select the group and then add the desired user. Depending on whether you want to include several users in the same group, or a user in several groups, one of the two methods can be used.
The process of removing a user from a group is the same. When you select a user, all groups belonging to it are highlighted in yellow. Place your cursor on one of the groups and remove the user via the button.
Add or remove an asset from a user group
The process of adding an asset to a user group is the same as adding users (see section
"Add or remove users to a user group").
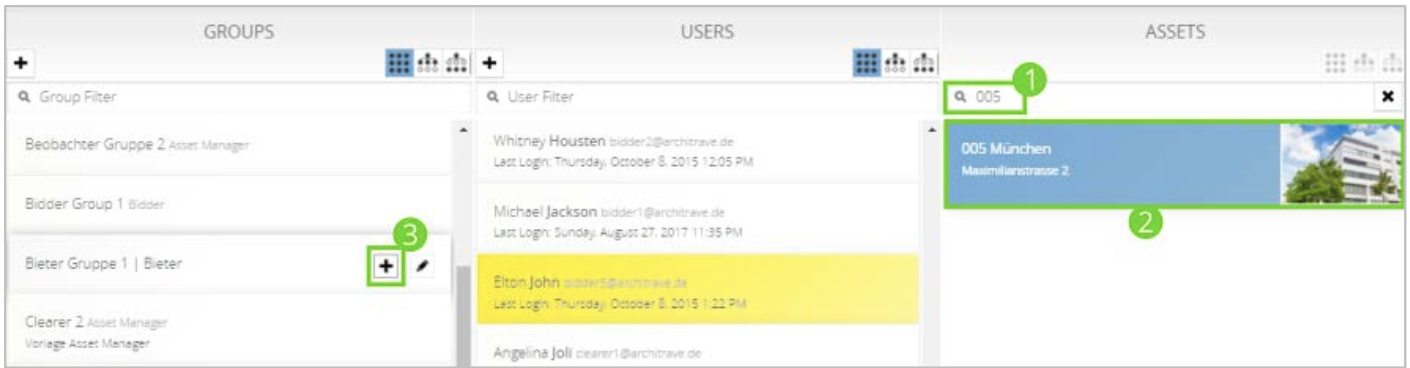
- Find the desired asset via the asset filter.
- Mark it with a click.
- Then place your mouse pointer on the desired group and add the asset via the "plus" button. Here, too, you will receive a confirmation message after successful completion.
The process of removing an asset from a group is the same. When you select an asset, all groups that contain it are highlighted in yellow. Place your mouse pointer on one of the marked groups and remove the asset via the  button.
Edit or delete user/user group
Place your mouse pointer on the desired group or user. Then click on the displayed 
button to edit this.
The same input mask opens as shown in section "Create a user group"
or "Create a user". Additionally you will find the
 button, to delete the user or group.
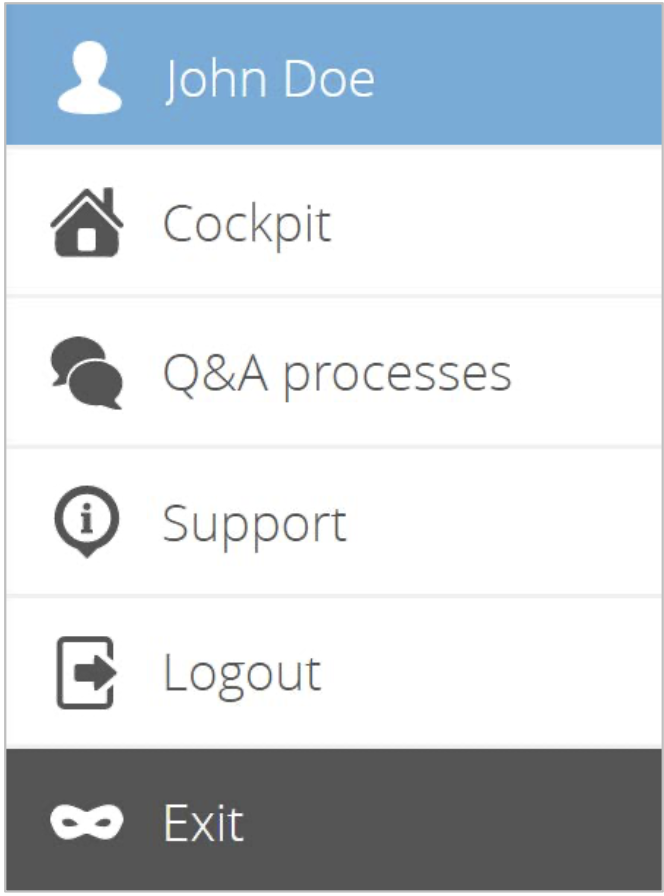
Inherit permissions of a user
If you want to check as an admin, if a user has access to all required functions and assets, you can inherit the users permissions and see the data room with his/her access rights. To use this feature, the user must have registered with a password and logged in at least once. You can recognise this in the user management by the user status, ‘Last Login'.
Select the desired user with a right-click and then select ‘Inherit permissions'.

If you have inherited the permissions of a user, his/her name will be displayed in the menu. Furthermore, the additional menu entry "Exit" is available with which you can terminate the inheritance of the users permissions.
Portfolios and assets
Here you manage all portfolios and assets of the data room.

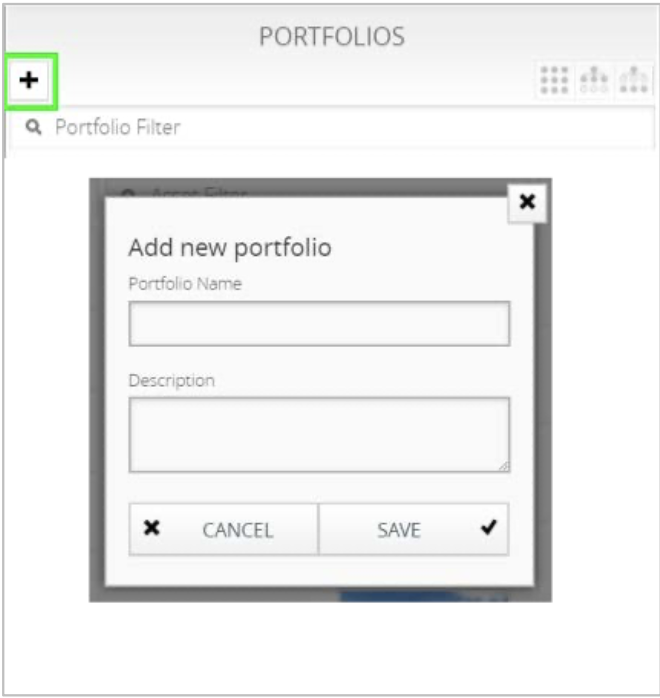
Create a portfolio
In the section 'Portfolios', click the 'Plus' button to open the edit mask to create a new portfolio. Give a name to the portfolio and add a description if necessary.
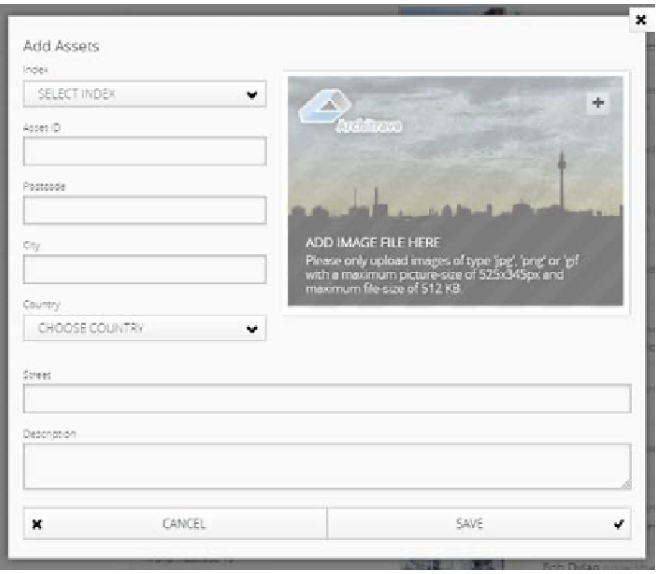
Create an asset
In the section 'Assets', click on the 'Plus' button to open this editing mask to create a new asset. Select an index from the drop-down menu. Enter the Asset ID (format and length freely selectable), postal code, city, country and address of the asset. If necessary, you can also enter a description of the asset.
Make users happy and add a vivid picture to the asset. This is displayed at different locations in the data room (for example, the cockpit tile, the thumbnail image in the Document Organizer). Supported are files of type 'jpg', 'png' or 'gif' with maximum dimensions of 525 x 345 px and a maximum size of 512 KB.
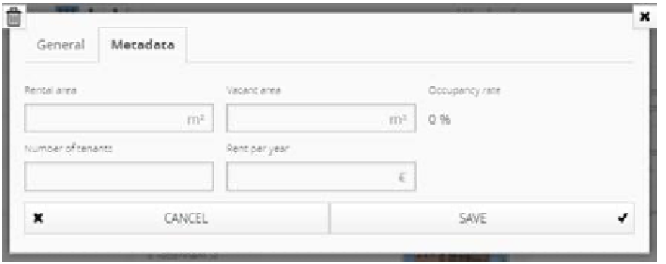
Edit object properties
Place your mouse pointer on the desired asset and click on the 
button to edit the general data or metadata.
In the register 'General', you can edit the data described in section "Create an asset". In the register 'Metadata' you can enter rental space (in m2), vacancy (in m2), number of tenants and rent p.a. (in €).
With the button  you can delete the asset.
NOTE: This will remove the asset from the data room and delete any documents it contains. Also, all questions and answers related to the asset are deleted from the Q & A process.
Include an asset in a portfolio or remove it
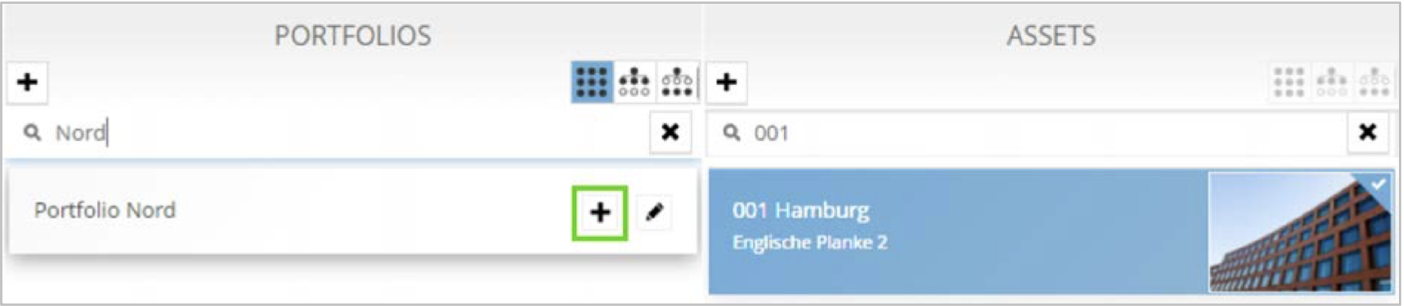
Highlight the desired asset and place your mouse pointer on the portfolio into which you want to add the asset. The two buttons for adding and adjusting the portfolio are displayed. Click on the button  to add the highlighted asset.
The procedure for removing an asset from a portfolio is similar. When you mark an asset, all portfolios in which it is included are highlighted in yellow. Place your mouse pointer on one of the yellow portfolios and remove the asset via the  button.
Assign responsible managers to an asset or remove them
You can specify up to two managers for an asset. The name or names are then displayed in the tile details of the asset in the cockpit. To assign a manager, select his name and then place your mouse pointer on the associated asset. Then
click on the displayed  button.
The procedure for removing a manager from an asset is similar. When you select an asset, assigned managers are highlighted in yellow. Place your mouse pointer on one of the selected managers and remove it via the  button.
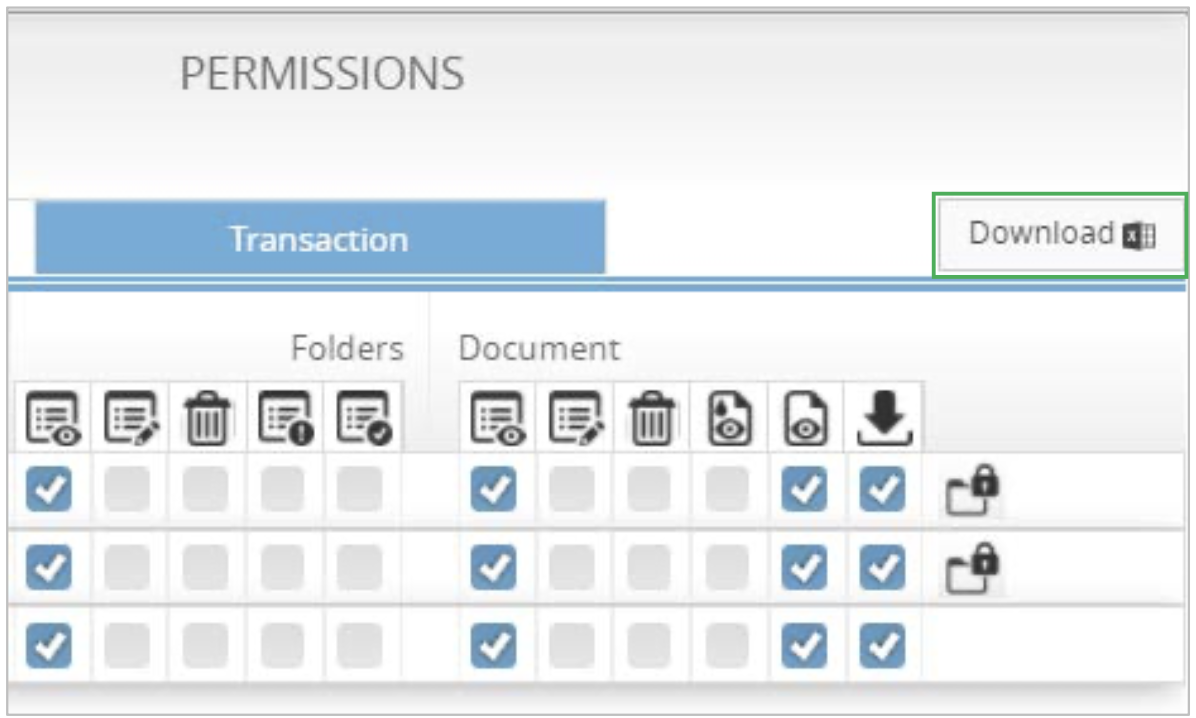
Permissions
In this section of the administration, you adjust the permissions of the user groups.

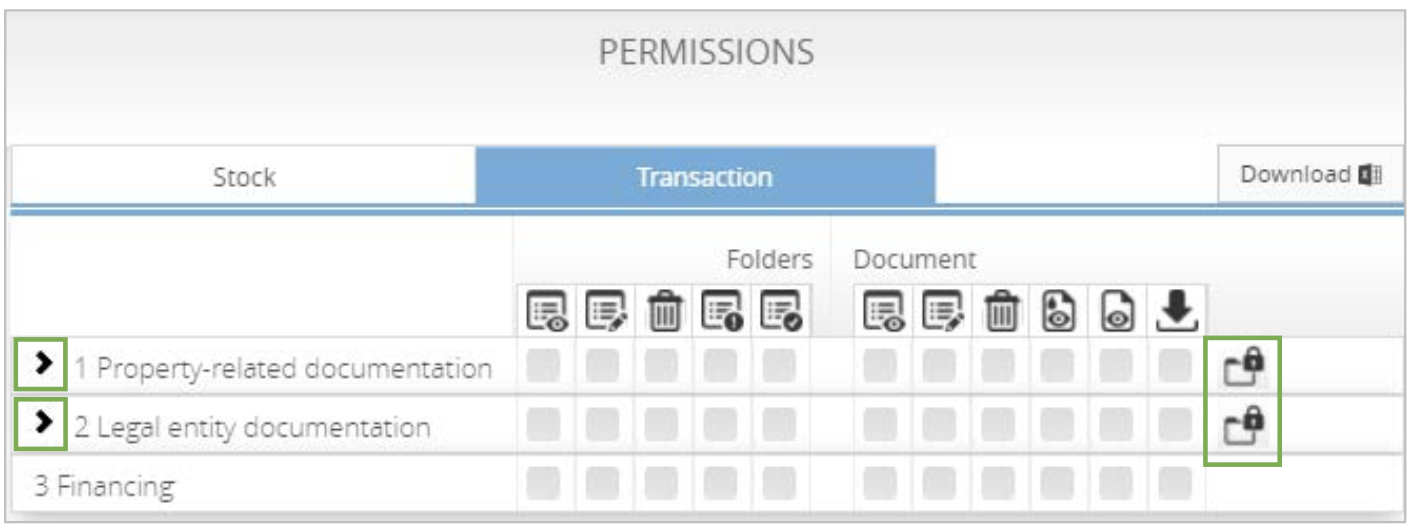
Set permissions of a user group for an asset
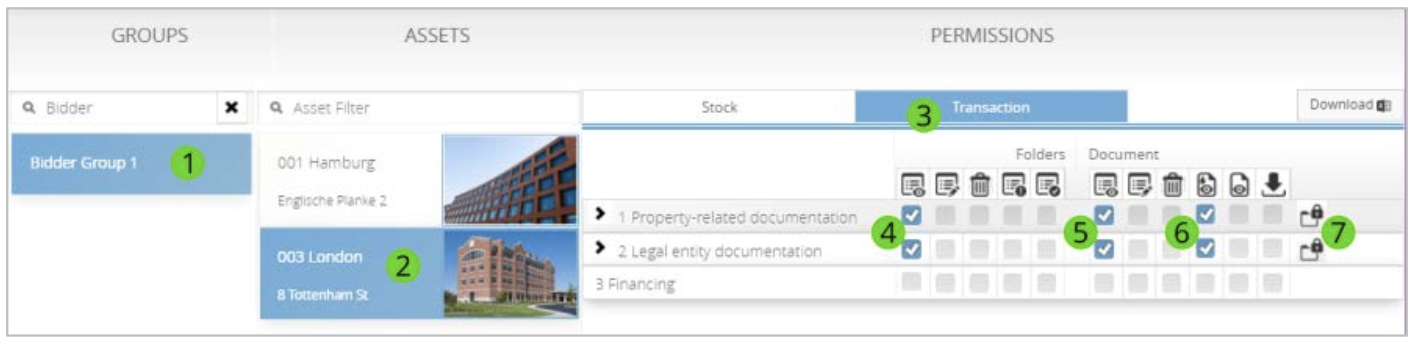
1. Select the group whose permissions you want to adjust.
2. 'Assets' section lists the assets contained in the selected group. Select the asset you want to view to see its permissions in the "Permissions" section.
3. Choose between "Stock" and "Transaction" to define the permissions for the respective status.
4. Active inheritance ensures that the permissions set for all subdirectories of the selected directories are applied. A detailed explanation on inheritance is given in the following section "Inherit permissions".
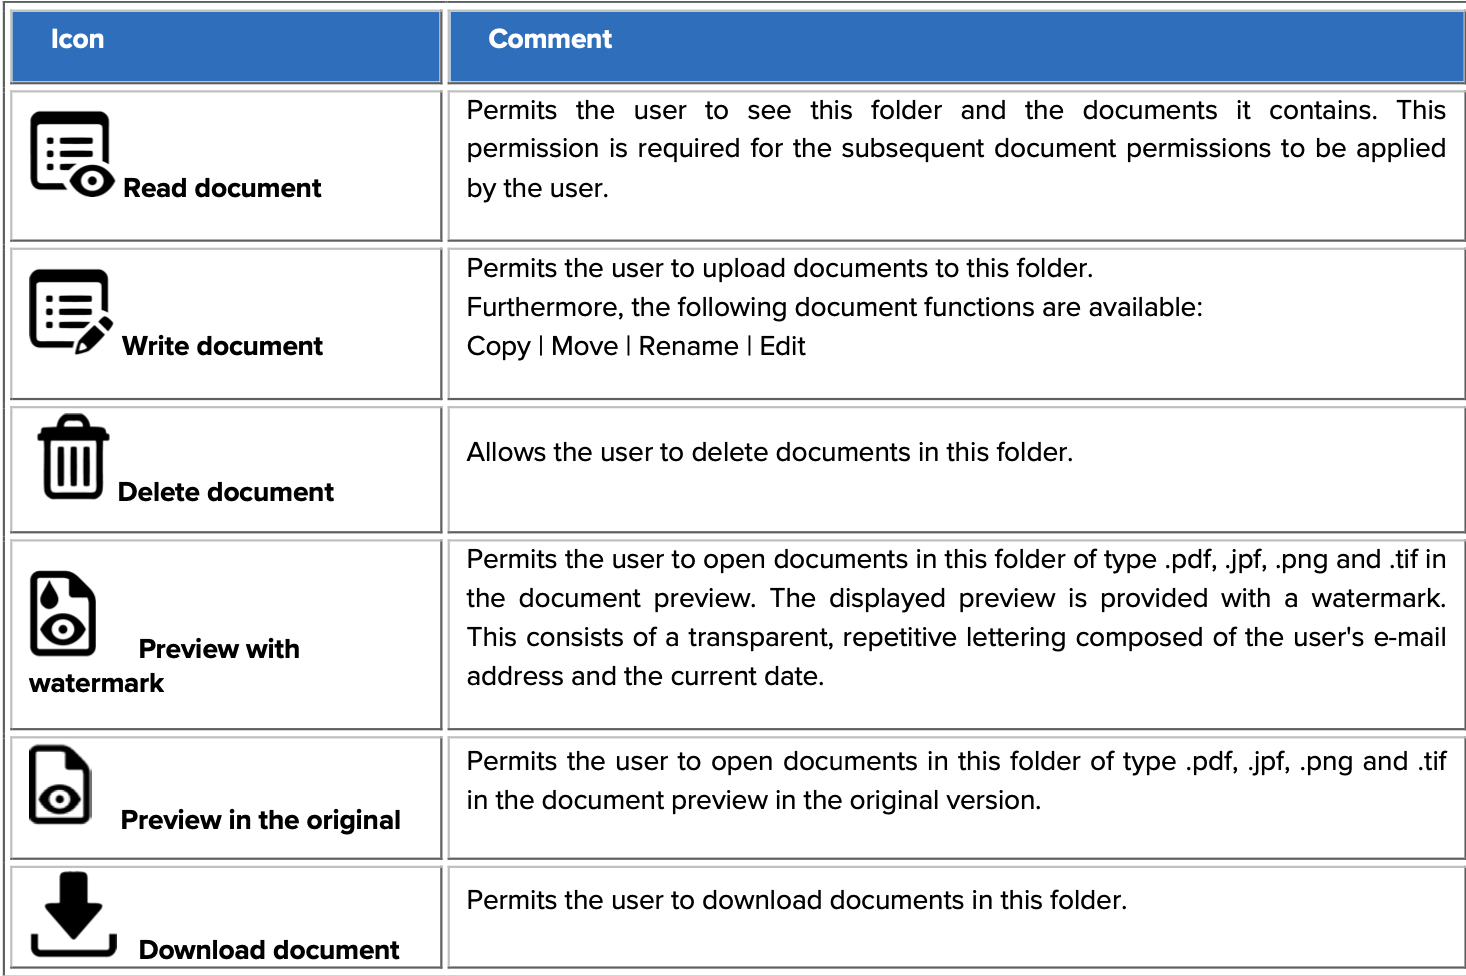
Explanation of the different permissions for directories and documents
In the illustration you can see the assigned permissions of 'Bidder Group 1' on the asset '003 London' if it is in transaction.
Permission icons on folder level
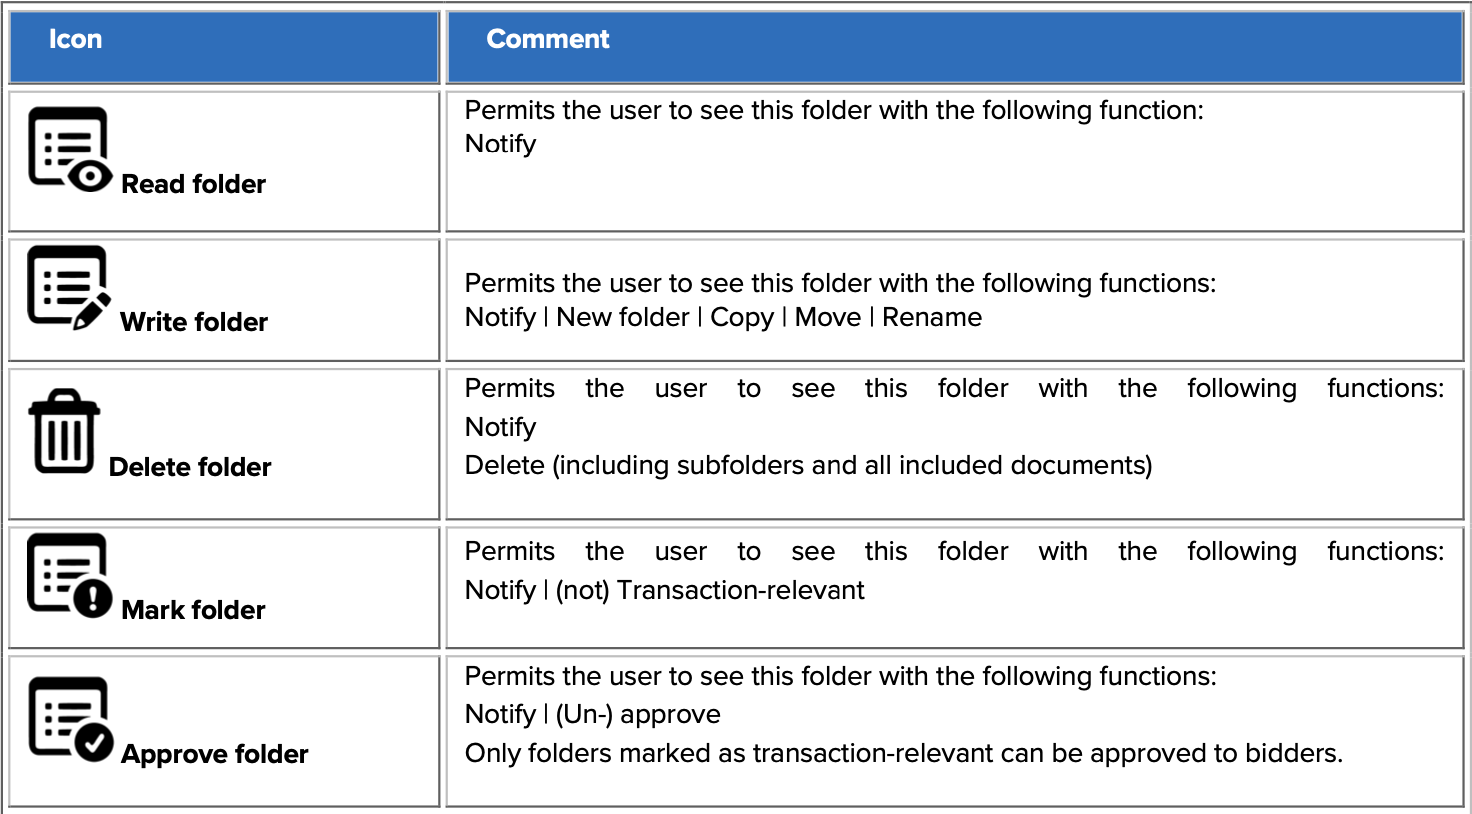
Permission icons at the document level
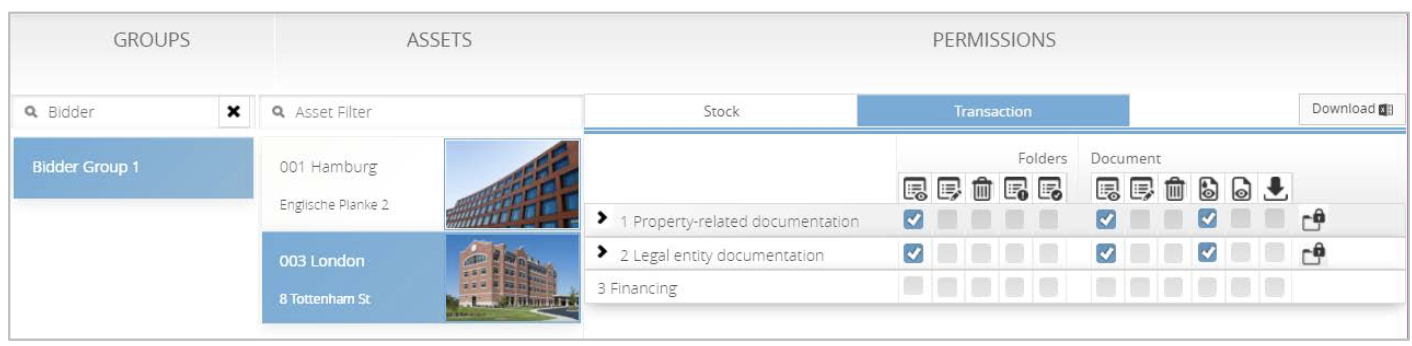
Inherit permissions
For not having to set permissions individually for all subdirectories, inheritance can be activated. When setting a permission to a directory, this is then adopted for all subdirectories.
 Inheritance active
 Inheritance inactive
Inheritance is active for both directories so that set permissions are also applied to all subdirectories.
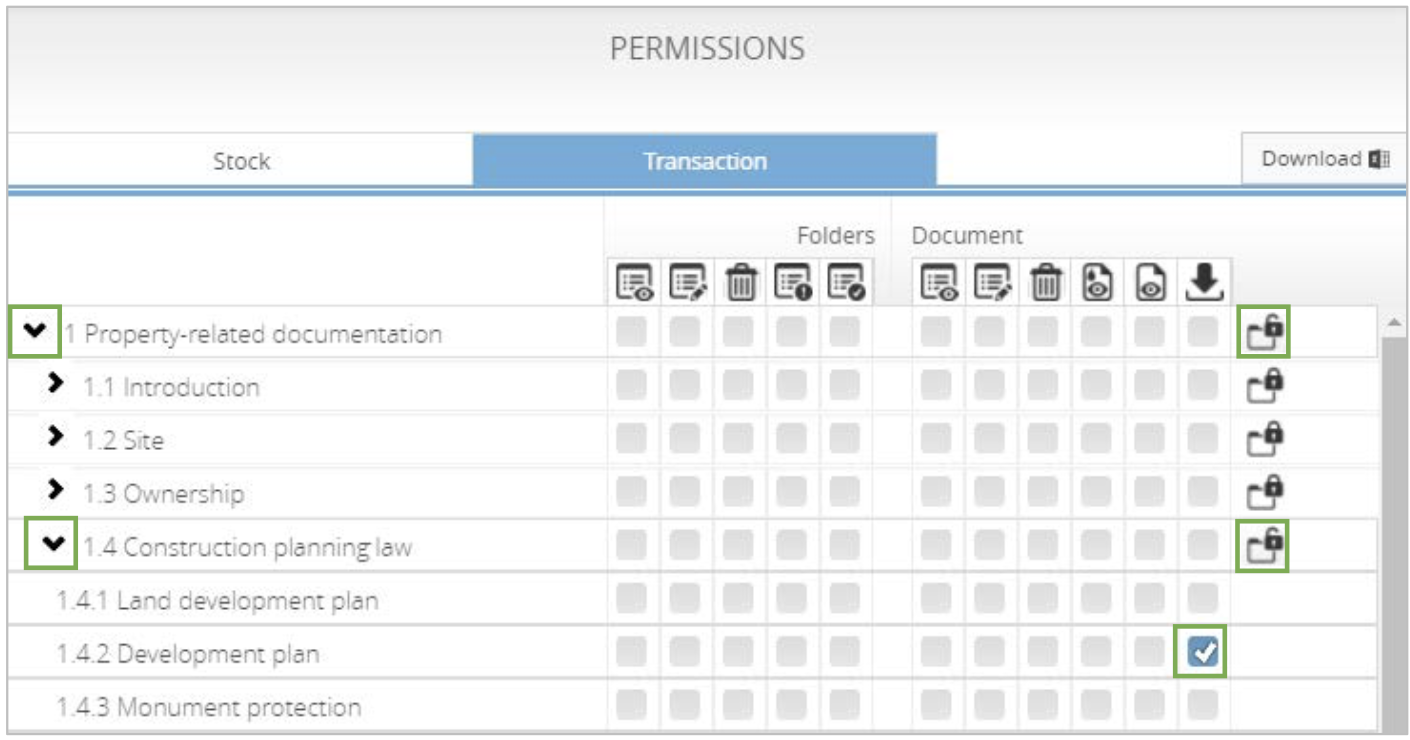
You can also grant permissions to individual directories. Expand directories by clicking on the arrow until the desired directory is displayed. When you expand a directory, inheritance is automatically disabled. Here the permission to download the documents is granted only for the directory '1.4.2 Development plan'.
Export permissions of a user group
By clicking on the download button, you download the permissions of a user group to a specific asset in the form of an Excel document. The document shows all folders and the associated permissions at a glance.